Getting Started
ChatShield is a data loss prevention and AI governance tool. It runs as a browser extension that sits between your staff and the AI tools they use day-to-day, so sensitive business data doesn't accidentally leave the company in a chat window.
What ChatShield does
When a member of staff sends a message in ChatGPT or Claude, the extension intercepts the submission, checks the message against your organisation's rules, and either lets it through, warns the sender, or blocks the message entirely. The check happens locally in the browser before the message is ever transmitted to the AI tool.
ChatShield also scans the content of files your team attaches. When someone adds a Word, Excel, PDF, or text file, the extension reads its text on the device and checks it against the same rules before the file is uploaded — blocking or warning just as it does for a typed message. Parsing happens entirely in the browser, so file content never leaves the device. Images and scanned documents are not read (there is no OCR). You can turn file scanning off in Settings.
What ChatShield does not do
- It does not store message content. Message text never leaves your browser. ChatShield only receives metadata: which rule triggered, which AI tool, the action taken, and a timestamp.
- It is not an airtight security perimeter. Staff who want to bypass it can use a different browser, disable the extension, or paste content into an unsupported tool. ChatShield is a governance and training layer, not a hard control.
Supported browsers
Chrome and Edge.
Supported AI platforms
ChatGPT (chat.openai.com) and Claude (claude.ai).
Setting Up Your Account
Signing up
Head to the signup page, enter your work email, and create your organisation. We send a magic link to verify the address. Click it and you're in. A card is collected up front to start the 14-day free trial, but you're not charged until the trial ends.
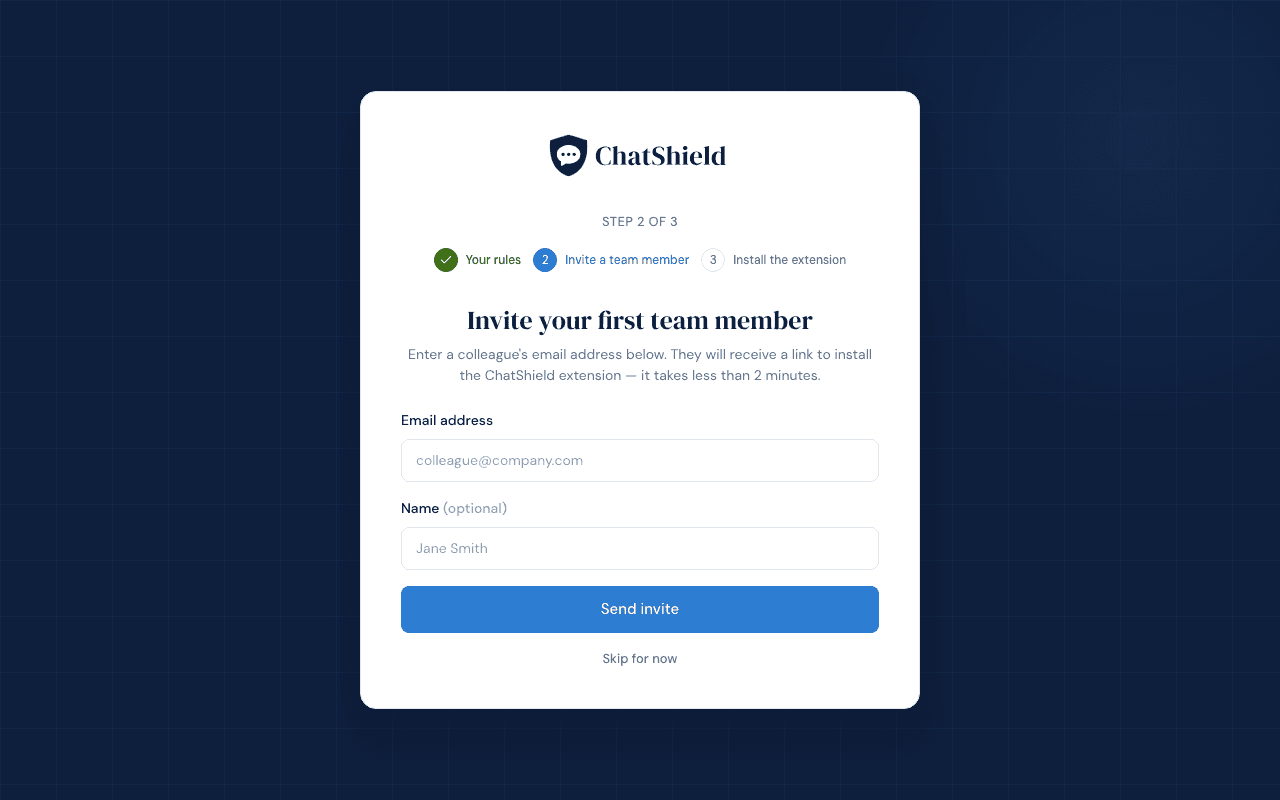
The three-step onboarding wizard
- Review your rules. Every organisation starts with a set of built-in rules covering UK PII, financial details, credentials, and company identifiers. They're enabled by default. Toggle off anything that isn't relevant to your business.
- Invite a team member. Send at least one staff invite during onboarding. Your dashboard fills with real activity much faster when there's a teammate using the extension.
- Install the extension. We link out to the Chrome Web Store and Microsoft Edge Add-ons. Install it on the same browser you signed up with, then return to the dashboard.
What to expect on day one
Your dashboard will sit mostly empty until staff start sending messages in ChatGPT or Claude. The first activity event usually appears within a few minutes of an attempted block. Until then, you can spend the time tuning rules and inviting the rest of your team.
Accessing the dashboard
The admin dashboard lives at chatshield.ai/dashboard. We don't use passwords. Every sign-in is a fresh magic link sent to your admin email address. The link expires after 15 minutes, so always click it from the same device you requested it on.
Inviting Your Team
Sending an invite
Head to the Team page in the dashboard. Add a name and email and click Send invite. The staff member receives an email with a unique invite link.
What the staff member sees
The link opens a splash page on chatshield.ai with two checkboxes:
- Extension installed. Ticks as soon as the extension is detected in the browser. If it's missing, the page shows install buttons for Chrome and Edge.
- Account connected. Ticks once the extension has paired itself to the invite token. This happens automatically when both boxes can be ticked.
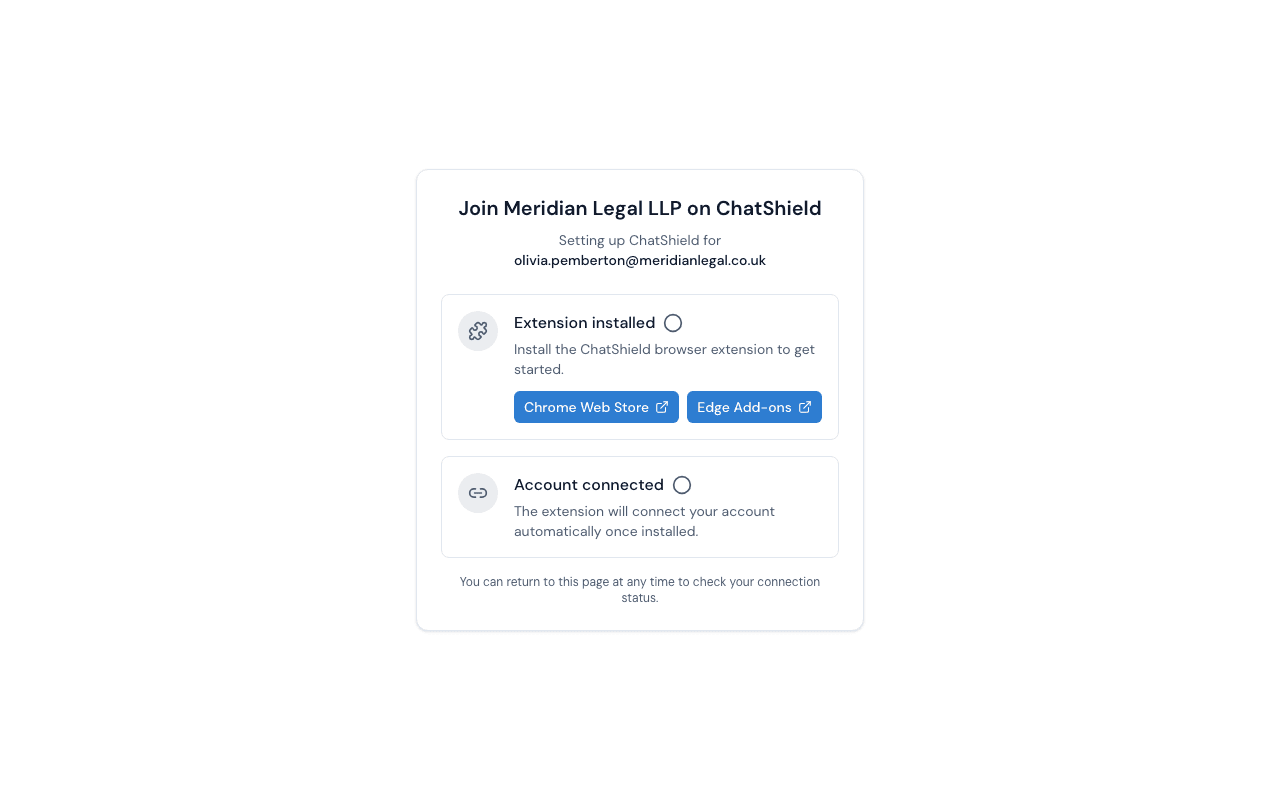
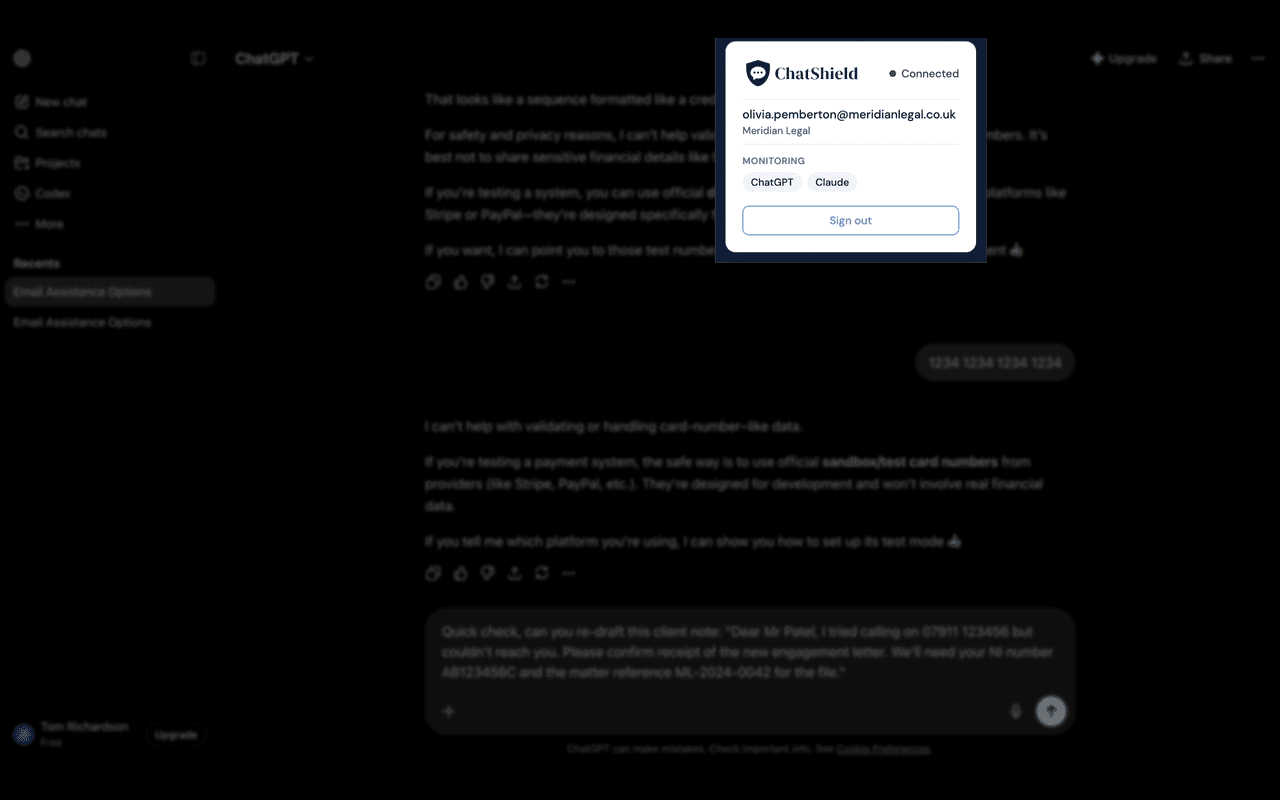
Once both ticks are green, the staff member is set. They don't need to log in to ChatShield ever again. The extension carries the connection. To confirm at any point, click the ChatShield icon in the browser toolbar. A connected popup shows their email, the org name, and the LLM platforms being monitored.
Connection statuses
- Connected. Extension installed and paired. Messages are being scanned.
- Pending. Invite sent, link not yet opened or extension not installed.
- Disconnected. Extension was paired before but is no longer reporting in, usually because it was uninstalled or the token was cleared.
Resending an invite
On the Team page, the row of any staff member with a Pending or Disconnected status shows a Resend action. Click it to send a fresh invite email. The original invite link stays valid for reconnection by the same user, so they can also just open the original email again.
Troubleshooting: extension installed but not connecting
Ask the staff member to open the invite link again from their inbox. Make sure they open it in the same browser the extension is installed in. If Chrome has the extension and they click the link in Edge, it won't pair.
Managing Rules
Built-in rules
ChatShield ships with a default set of rules, grouped into four categories:
- PII. Email addresses, UK phone numbers, postcodes, National Insurance numbers.
- Financial. Payment card numbers, UK sort codes, IBANs.
- Credentials. Common API key patterns, database connection strings.
- Company. UK VAT numbers, Companies House registration numbers.
Toggling rules on and off
On the Rules page, every built-in rule has an enable/disable switch. Disabled rules don't fire. The message passes through as if the rule didn't exist. Changes take effect the next time the extension pulls its config (within about two minutes).
Changing severity
Each rule has one of three severities:
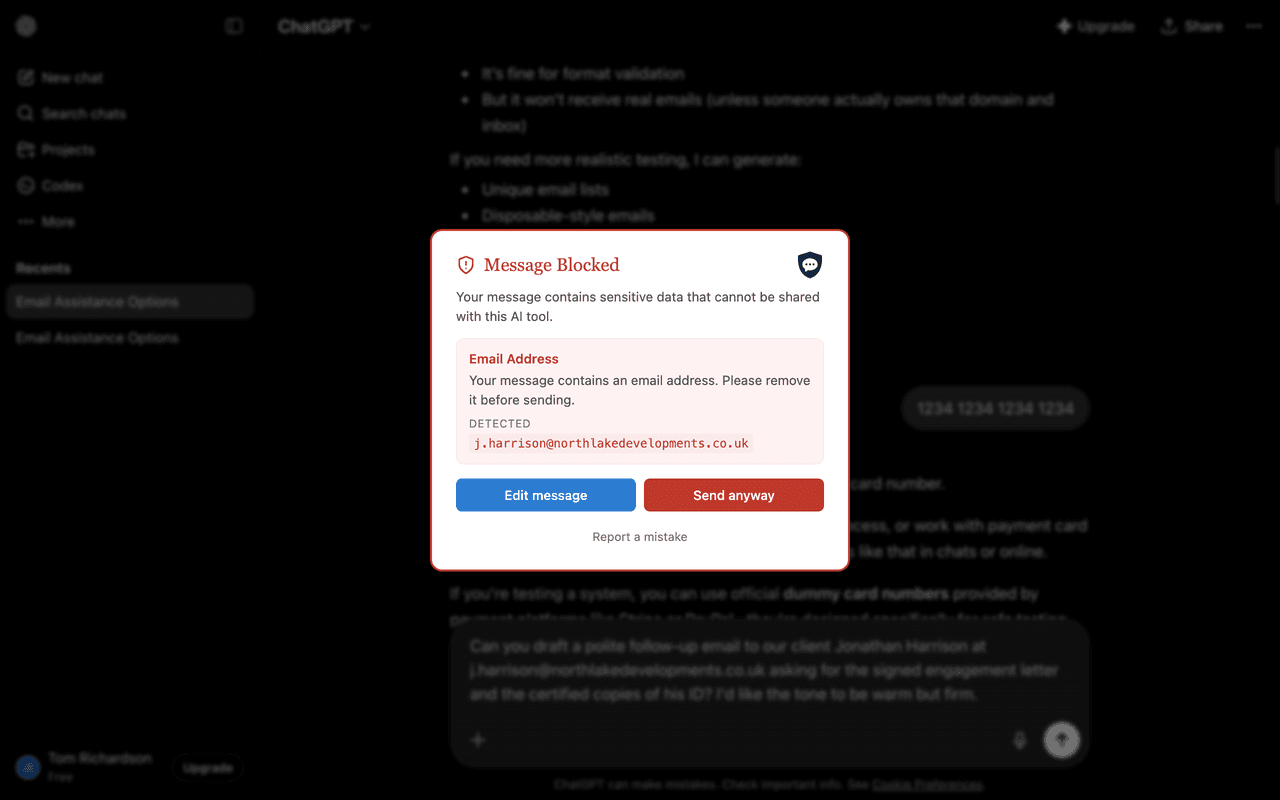
- Block. The message cannot be sent. Staff must edit the message and resubmit.
- Block with override. The message is blocked by default, but staff can click Send anyway to push it through. Overrides are flagged to you on the activity log.
- Warn. A non-blocking notice. Staff can dismiss and proceed.
Custom rules
Add your own rules from the Custom Rules section at the bottom of the Rules page. Click Add Rule to open the rule builder. Each custom rule needs a name, one or more keywords or phrases, a category, and a severity. You can also write a custom block message that staff will see when the rule fires, and an allow list of values you want this rule to ignore.
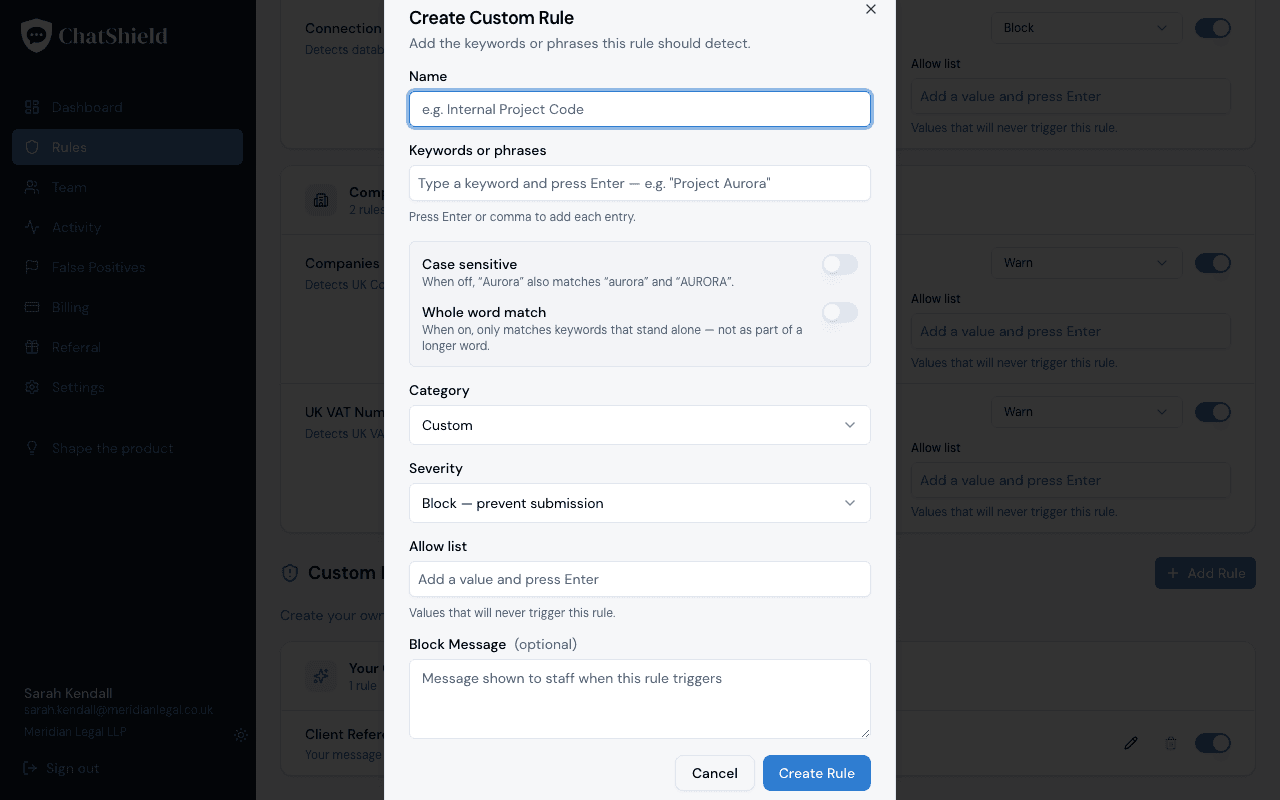
Two toggles control how strictly keywords are matched, and both are off by default:
- Case sensitive. When off,
Auroraalso matches aurora and AURORA. - Whole word match. When on, a keyword only matches when it stands alone.
Acmewould match Acme but not acmedemo. When off (the default), substring matches fire as well.
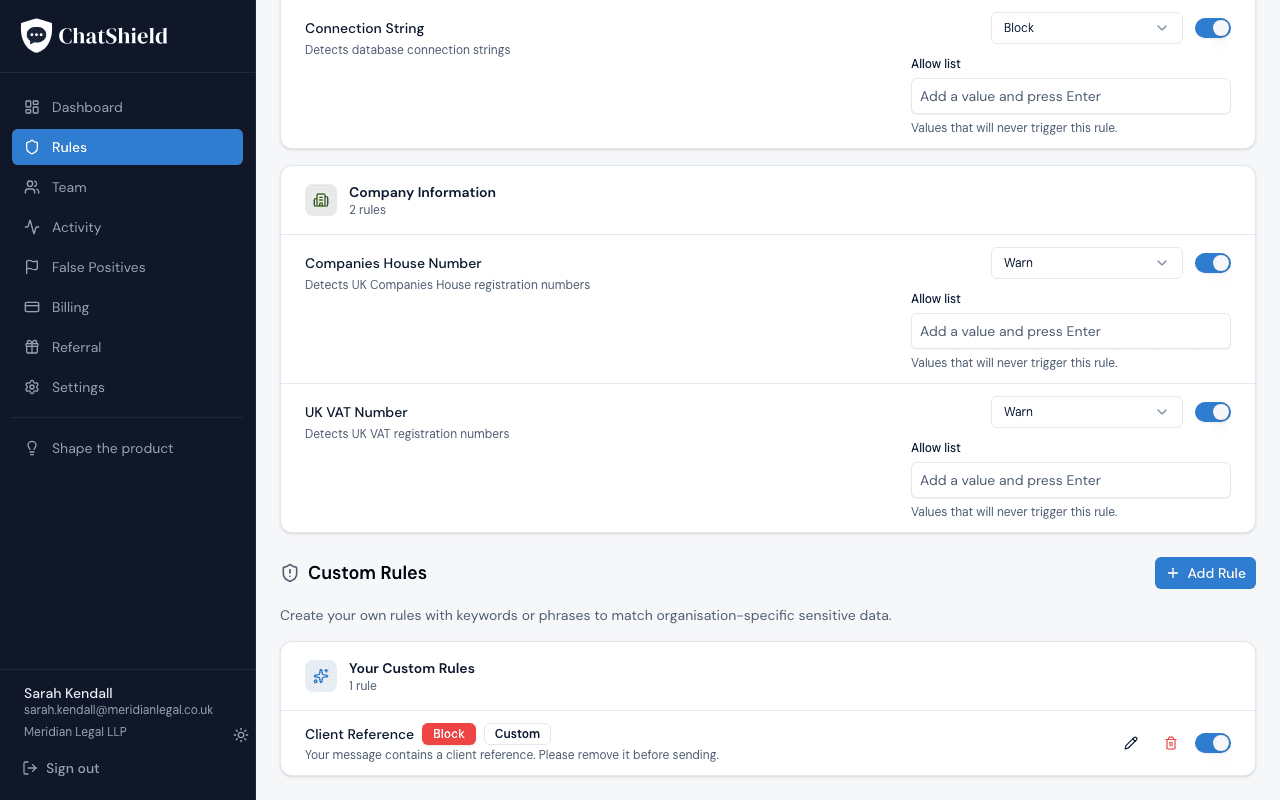
The allow list
Every rule has an allow list: values that will never trigger the rule even if the pattern matches them. Useful when a built-in rule is catching internal addresses or numbers you're happy to share with the AI tool.
Allow list entries are matched case-insensitively as exact strings. On the built-in email rule, the wildcard *@yourcompany.com matches any email address at that domain.
What happens when a rule triggers
Staff see a centred overlay in the AI tool with the rule name and the detected content highlighted. You see an activity event on the dashboard immediately, naming the rule, the staff member, and the action they took.
Understanding Blocks and Warnings
What staff see when a message is blocked
A centred overlay appears in the AI tool. It dims the chat behind it so it's clear the submission is paused. The overlay names each rule that matched (for example, UK Phone Number or National Insurance Number), repeats the rule's short block message, and highlights the triggering text from the message so the staff member can see exactly what to remove. The submission does not go through. The AI tool never receives it.
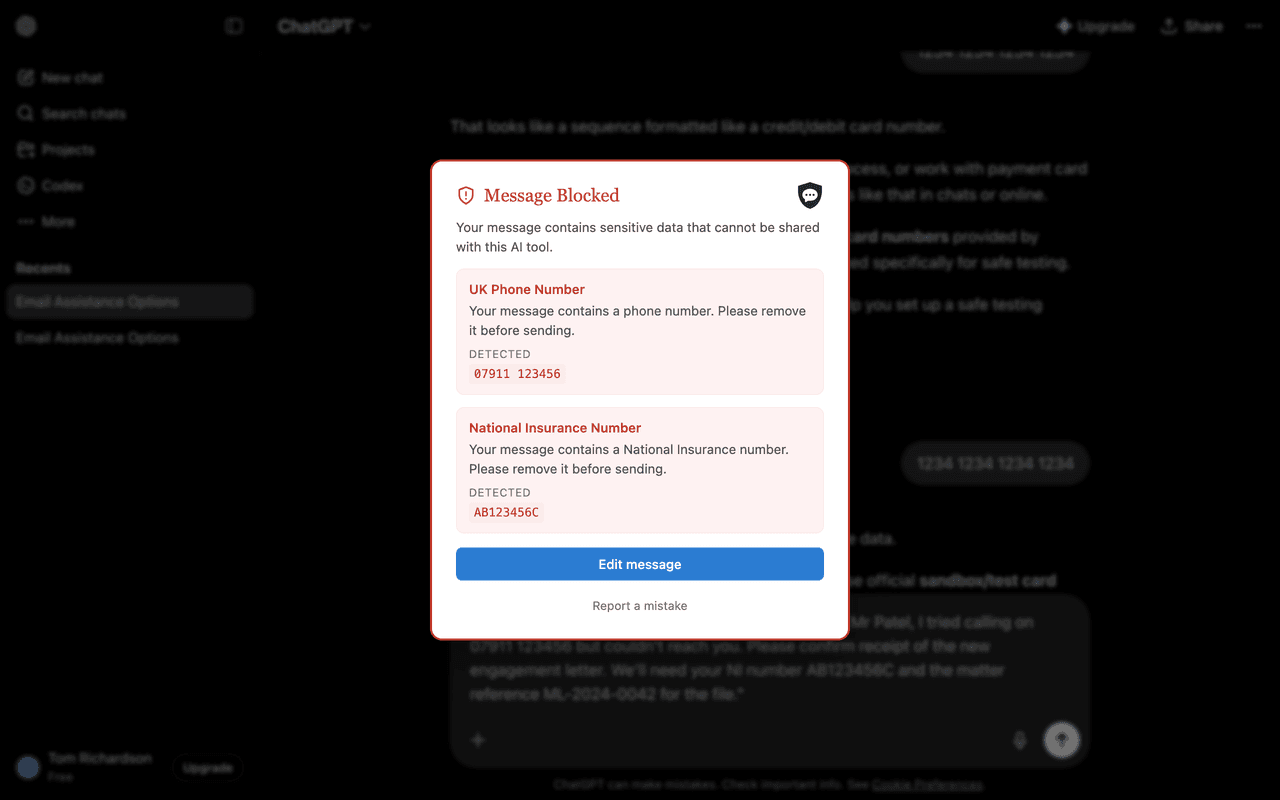
Editing and resending
Staff close the overlay, edit the message to remove the offending content, and submit again. The extension re-evaluates from scratch on the new submission.
The override flow
Rules set to block with override show a Send anyway button next to Edit message. Clicking it requires explicit confirmation before the message goes through. The action is logged as an overridden event on the dashboard, so admins can see who overrode which rule and when.
Reporting a false positive
Every block UI includes a Report a mistake link. Clicking it plays a brief tick animation in the overlay and logs the event as a false_positive action. The rule still prevented the submission. False positive reports don't unblock the message, they just help admins know which rules need tuning.
No message content is sent when a false positive is reported. The event records only the rule ID and timestamp.
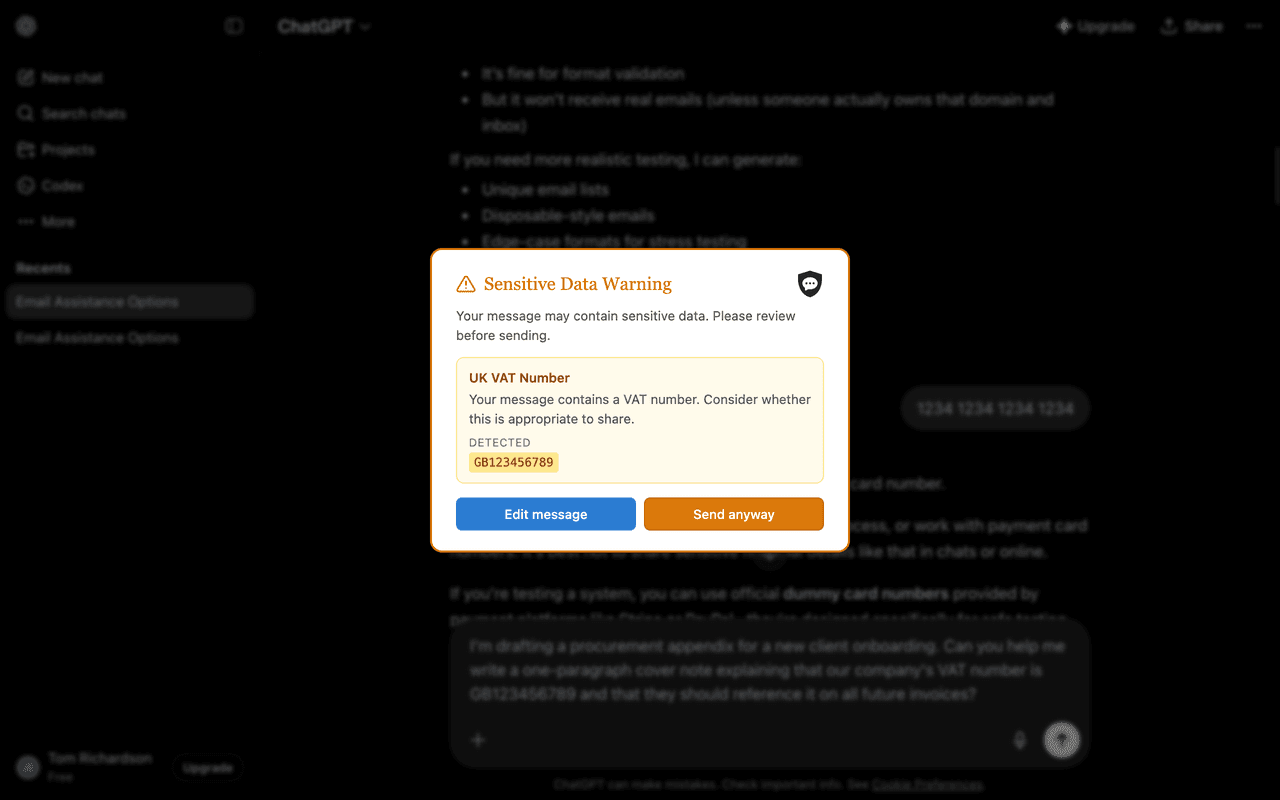
Warn severity
Warn rules show an amber overlay instead of the red block one. Staff see the rule name, the detected text, and two equal-weight buttons: Edit message and Send anyway. The amber treatment signals “this might be sensitive, take a second look”, whereas the red overlay signals “this cannot leave the company”. The action is logged as a warned event whether staff edit the message or send anyway.
File attachments
The same block and warn overlays apply to files. When staff attach a Word, Excel, PDF, or text file, ChatShield reads its text content locally and checks it against your rules before the file is uploaded. If the content triggers a block or warn rule, the same overlay appears and the file is held back until the sender edits, cancels, or (for warn and override rules) proceeds. Parsing happens entirely in the browser, so file content never leaves the device.
Text-based formats are covered; images and scanned documents are not read, as ChatShield does not perform OCR. A file that can't be scanned prompts a warning by default so the sender knows it went through unchecked. Admins can turn file scanning off entirely in Settings.
Reading Your Dashboard
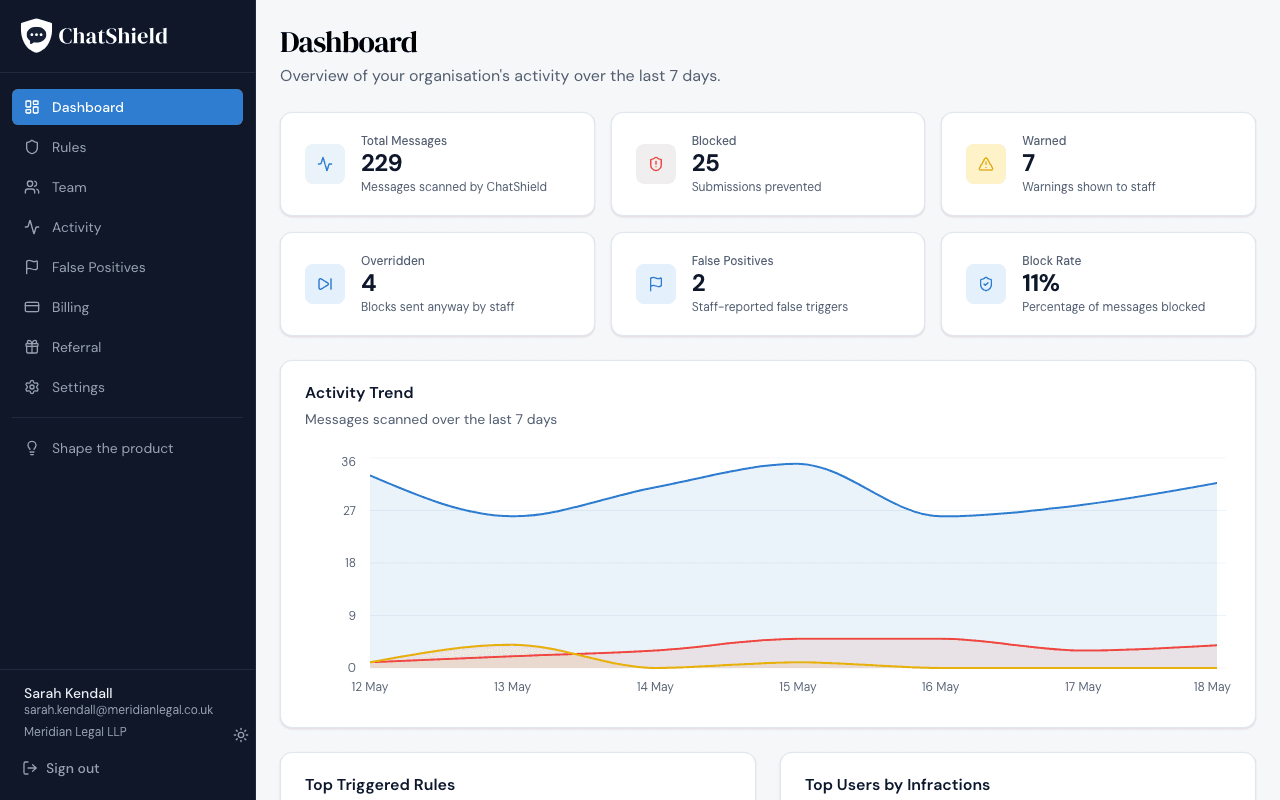
Top-of-page metrics
- Total messages. Every submission attempt across your organisation, regardless of outcome.
- Blocked. Submissions stopped by a rule. Includes block-with-override events where staff did not override.
- Warned. Submissions that fired a warn-severity rule and were sent after dismissing the warning.
- Overridden. Block-with-override events where staff clicked Send anyway and pushed the message through.
- False positives. Blocks that staff reported as a mistake using the Report a mistake link.
- Block rate. Blocked over total messages, expressed as a percentage.
Top triggered rules
A leaderboard of which rules fire most often in your organisation. Worth checking weekly. If one rule is firing far more than the others, it's usually a sign the rule needs tuning or staff need a nudge. The card also surfaces a False +ve column so you can see, at a glance, which rules staff disagree with most.
Top users by infractions
Lists the staff members with the most rule triggers in the period, with a separate column counting how often each person clicked Send anyway. Useful for spotting people who could benefit from extra training. The list isn't a punishment tool. It's a prompt to have a conversation.
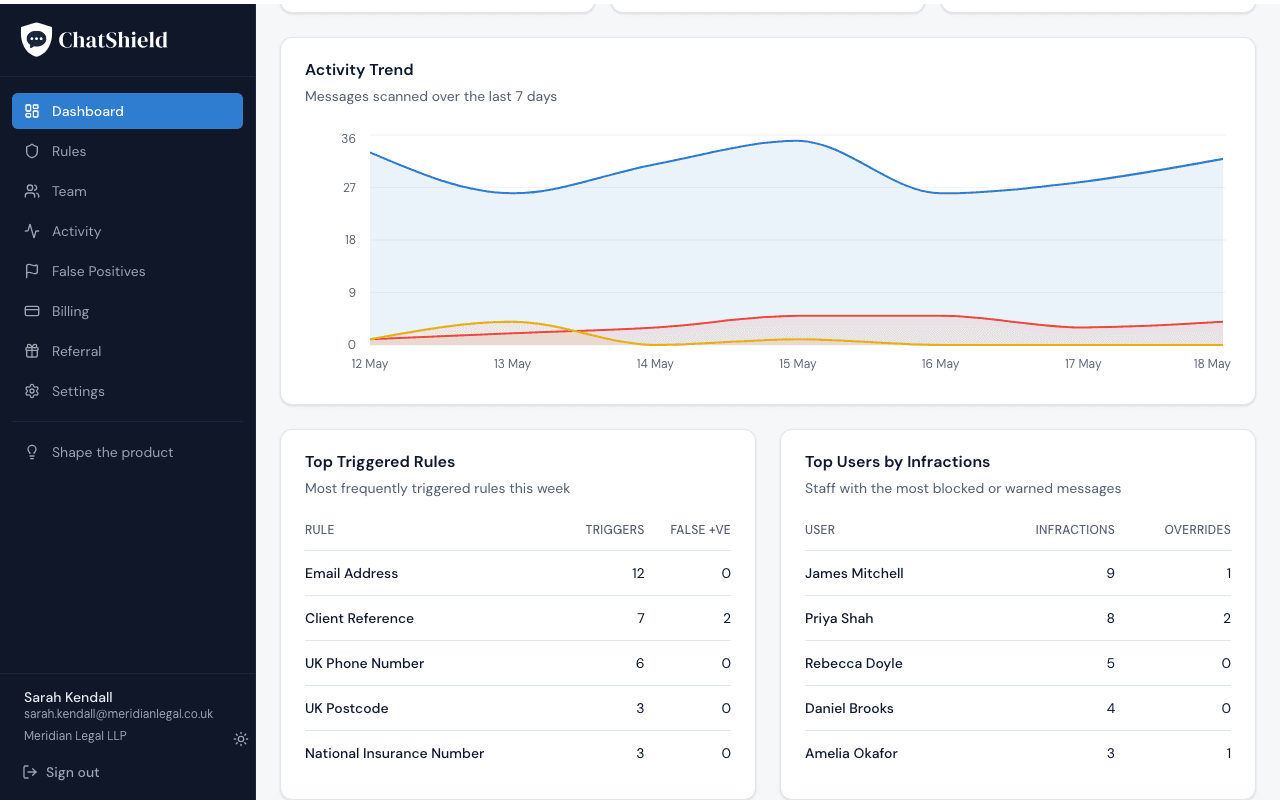
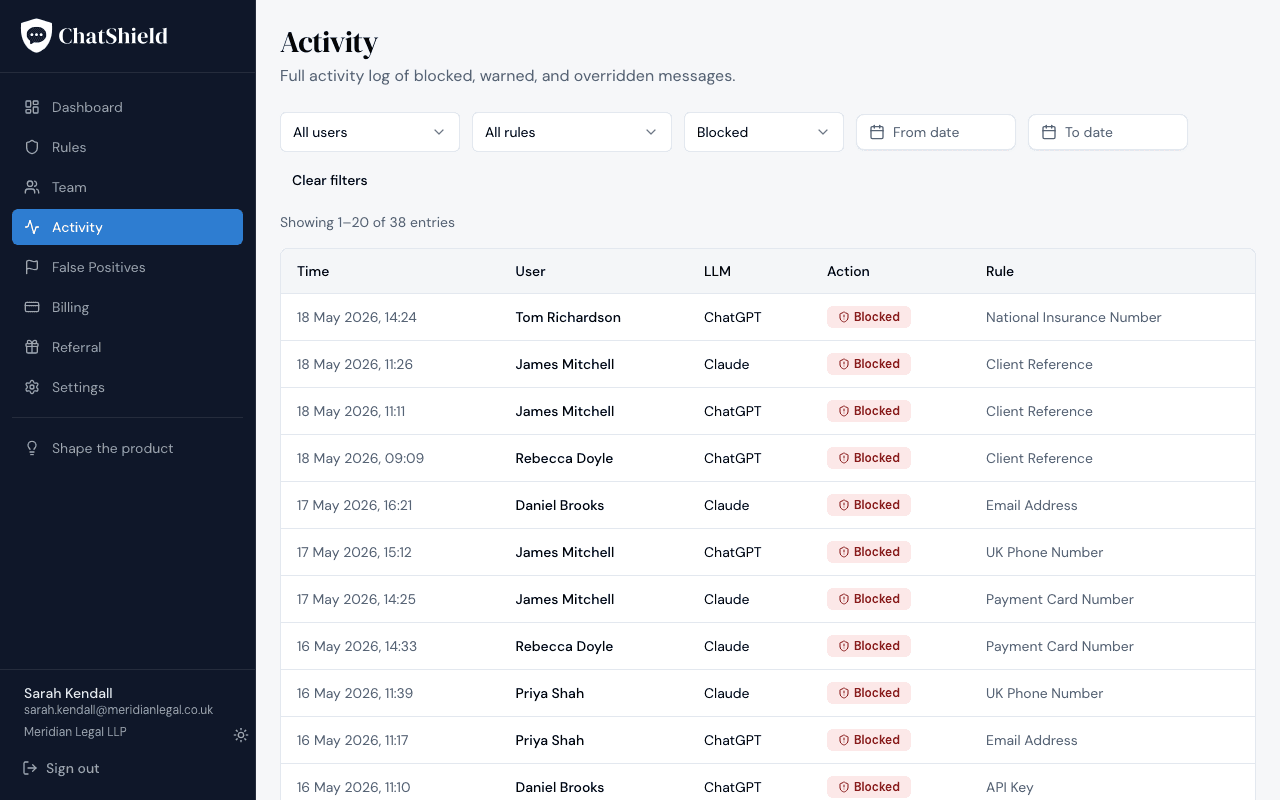
The activity log
A full list of every event, filterable by user, rule, action type, and date range. The action column carries one of five values:
- blocked. Rule fired, submission prevented.
- warned. Rule fired with warn severity, staff chose to proceed.
- sent. Message went through with no rule match.
- overridden. Block-with-override severity, staff clicked Send anyway.
- false_positive. Staff reported the block as a mistake.
Activity entries only record metadata: which rule, which AI tool, which user, what action, and when. No message content is stored.
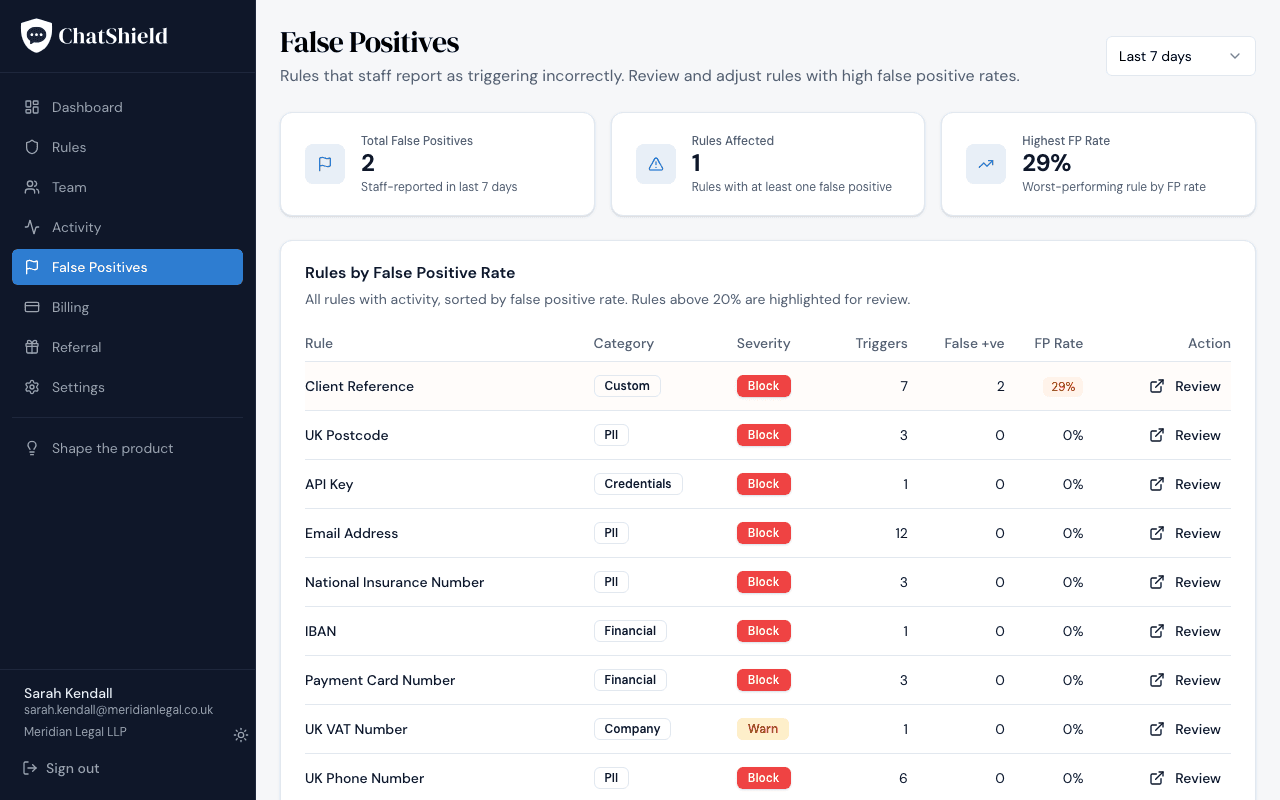
The false positives page
A dedicated view of rules with high false-positive rates, calculated as false positive reports over total triggers. If a rule has a consistently high false positive rate, consider:
- Lowering its severity from block to block with override or warn.
- Adding the most common false matches to the rule's allow list.
- Refining the rule's keywords (custom rules only).
Managing Your Team
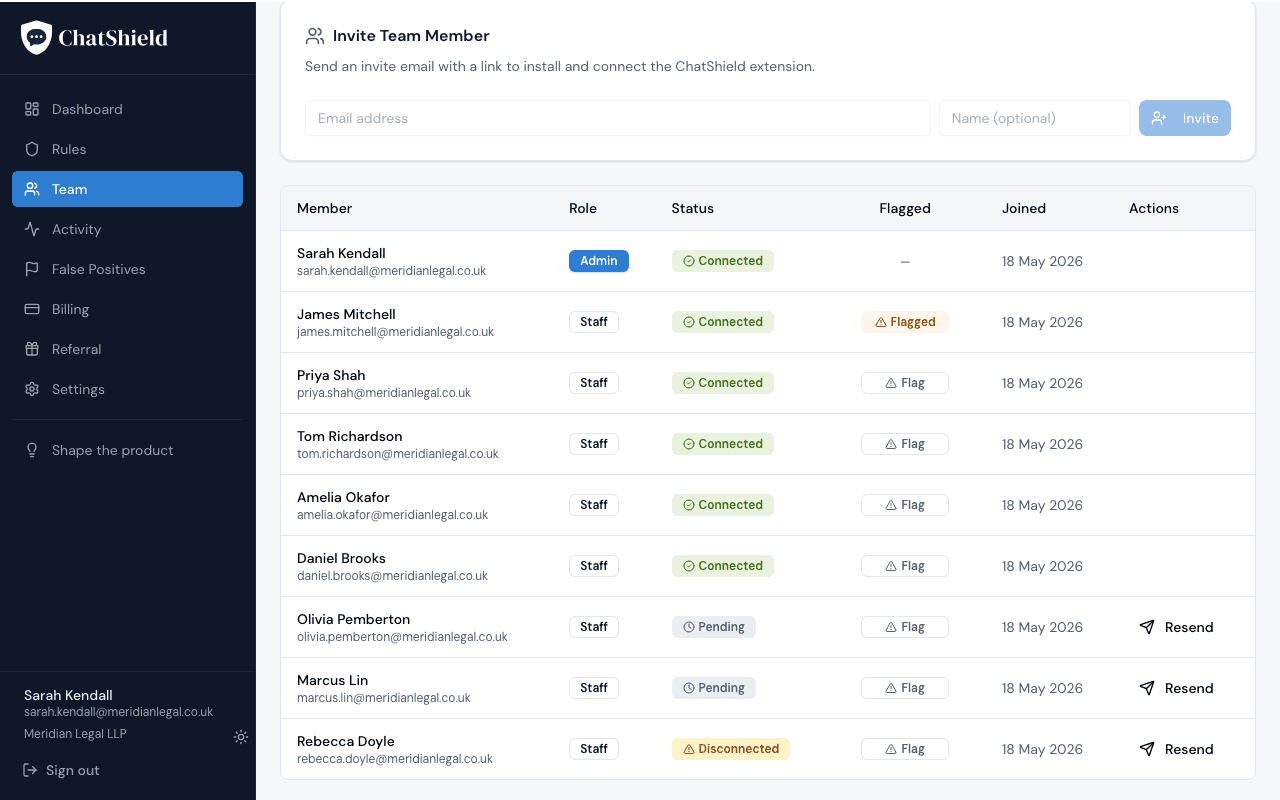
Seats used vs connected
A seat is a staff member you've invited and are being billed for. A connected seat is one where the extension is paired and reporting in. The Team page header shows both. Gaps between them are usually staff who haven't finished installing the extension.
Flagged for training
A staff member can be flagged for training in two ways:
- Automatic. 5 or more rule infractions in any rolling 7-day window.
- Manual. An admin clicks Flag for training on the staff member's row.
What happens when a user is flagged
Admins receive an email notification. Optionally, the staff member receives a templated email explaining what was triggered and pointing them at training material. Toggle this on the Settings page if you want staff notified directly.
Unflagging
Open the staff member's row and click Unflag. The flag also drops off automatically if no further infractions occur for the next 7 days.
Adding and removing team members
Add via the Invite button on the Team page. Remove via the Remove button on a staff row. This revokes their extension token immediately, stops them from reconnecting on the existing invite link, and frees up their seat. Removed users keep their activity history for admin reporting, and you can re-invite them later if needed. The user record itself can be permanently deleted on request.
10+ seats
ChatShield's self-serve flow caps automated signup at 10 seats. Above that, click the Contact us button on the billing page. We'll get back to you within one business day to set up a larger plan.
Billing
Trial period
Every new organisation gets a 14-day free trial. A card is required at signup so there's no interruption when the trial ends. You won't be charged until day 15.
What happens at trial end
On day 15, Stripe automatically charges the card on file for the plan you signed up to. The first invoice covers your first paid month. If you cancel before the trial ends, no charge is made.
Changing your plan
Open the Billing page and click Manage subscription. This opens the Stripe customer portal, where you can switch between monthly and annual billing, change plan, or update payment details. Annual billing is two months free compared to monthly.
Adding or removing seats
Inviting a staff member from the Team page automatically increases your seat count on Stripe. Removing a staff member decreases it on the next billing cycle. There's no minimum lock-in. You can drop seats whenever you like, subject to your plan's minimum seat count.
Cancelling
Open Stripe's customer portal from the billing page and click Cancel subscription. Your team keeps access until the end of the current billing period, at which point all extension connections are revoked and the dashboard becomes read-only.
Referral programme
Every organisation gets a unique referral link from the Referral page in the dashboard.
- For you (the referrer). One free month of ChatShield, applied as Stripe credit, for every referral that completes their trial and makes a first payment.
- For the referred org. 50% off their first month when they sign up through your link.
Credit is applied automatically: no codes to copy, no claims to file. There's no cap on referrals.
Common Questions
Why is the extension not connecting?
The fastest check is the ChatShield extension icon in the browser toolbar. Click it. If the popup looks like the one below, the extension is installed but has never been paired to your org.

Ask the staff member to open their original invite link from their inbox, in the same browser the extension is installed in. The connection happens automatically once both checkboxes on the splash page can tick. After that, clicking the icon should show a green Connected indicator with the org name underneath.
Why did something get blocked that shouldn't have?
Two options. Staff can click Report a mistake in the block overlay. This logs a false positive event you can review on the dashboard. Admins can also add the specific value (or, for email rules, the entire domain via *@yourcompany.com) to the rule's allow list, so that exact value stops triggering the rule.
My team installed the extension but nothing shows in the dashboard.
Open the Team page and check each staff member's connection status. A green Connected pill means the extension has paired successfully. If everyone is connected and the dashboard is still empty, it means nobody has triggered a rule yet. Try sending an obviously-blocked test message (for example, a fake email address) in ChatGPT to confirm.
Does ChatShield work in incognito mode?
Not by default. Chrome and Edge disable extensions in incognito sessions. Staff can manually allow the ChatShield extension in incognito via their browser's extension settings, but we generally recommend treating incognito sessions as out of scope for governance.
What browsers are supported?
Chrome and Edge. Brave also works because it's Chromium-based. Install from the Chrome Web Store.
Does ChatShield read my messages?
Message content is evaluated locally inside the browser extension and is never sent to ChatShield servers. Only metadata leaves the browser: which rule fired, which AI tool was in use, what action was taken (blocked, warned, sent, overridden, or false positive), and a timestamp. No text from your messages is stored, logged, or transmitted, not even in hashed or truncated form.